Part 1: Linting your Code using ESLint
Installing ESLint
- Install ESLint from npm.
npm install eslint --save-dev
Configuring ESLint
- Setup the ESLint configuration file.
npm init @eslint/config - Follow these selections in the configurations wizard.
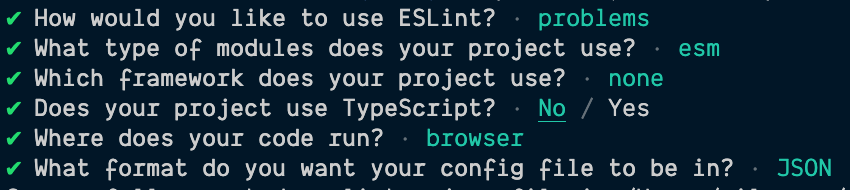
- You should now have a configuration file in your project, named
.eslintrc.jsonwith the following content.
.eslintrc.json
{
    "extends": "eslint:recommended",
    "parserOptions": {
        "ecmaVersion": "latest",
        "sourceType": "module"
    },
    "env": {
        "browser": true,
        "node": true,
        "es2021": true
    },
    "rules": {
    }
}
note
Please copy the above into your .eslintrc.json file, if they don't match.
- Add the following rules to to your
.eslintrc.jsonfile.
.eslintrc.json
{
    "extends": "eslint:recommended",
    "parserOptions": {
        "ecmaVersion": "latest",
        "sourceType": "module"
    },
    "env": {
        "browser": true,
        "node": true,
        "es2021": true
    },
    "rules": {
        "array-bracket-spacing": [2, "always"],
        "no-const-assign": 2,
        "no-var": "error",
        "indent": [2, 2],
        "quotes": [2, "backtick"],
        "eqeqeq": "error"
    }
}
- About the extra rules:
array-bracket-spacing: Enforce spacing inside array brackets.no-const-assign: Disallow modifying variables that are declared usingconst.no-var: Requireletorconstinstead ofvar.indent: Enforce consistent indentation - in this case 2 spaces.quotes: Enforce the consistent use of either backticks, double, or single quotes. - in this case backticks.eqeqeq: Require the use of===and!==.
Running and Using ESLint
Run ESLint on the project using one of the following options:
- Option 1: by running
npx eslint --ext .js resources/scripts - Option 2: by modifying the
package.jsonfile to include a quick-run script for linting.
package.json{
...
"scripts": {
"lint": "eslint --ext .js resources/scripts"
}
...
}- Now you can run
npm run lintto run ESLint on the project. You should see some issues that require your attention. - Try to solve a 2-3 issues (leave some for the next step).
- Option 1: by running
Improving the Developer Experience with VSCode Extensions
- Install the ESLint VSCode extension.
- This may require reloading your VSCode.
- Navigate to the files in
resources/scripts. You should now get VSCode highlighting the errors.- Try to solve a 2-3 issues (leave some for the next step).
- Configure VSCode to utilize the ESLint VSCode extension to fix any (easily) fixable errors. on file save.
.vscode/settings.json
{
  "editor.codeActionsOnSave": {
    "source.fixAll.eslint": true,
  }
}
- Go to any of the script file and save it. You should now see the errors fixed.
caution
You should still see some errors. Especially the one about RockPaperScissors class not defined and/or not being used. We'll take care of this in the next Part of this lab.